Tutorial: Creating an App
This page will provide a brief tutorial on creating a new PVTUI application. In this tutorial we will create a TUI for the following EPICS database:
record(ao, "$(P)Value") {
    field(DESC, "Tutorial!")
    field(VAL, 0.0)
}

record(ao, "$(P)TweakVal") {
    field(VAL, 1.0)
}

record(calcout, "$(P)TweakFwd") {
    field(INPA, "$(P)Value.VAL")
    field(INPB, "$(P)TweakVal.VAL")
    field(CALC, "A + B")
    field(OUT, "$(P)Value.VAL PP")
}

record(calcout, "$(P)TweakRev") {
    field(INPA, "$(P)Value.VAL")
    field(INPB, "$(P)TweakVal.VAL")
    field(CALC, "A - B")
    field(OUT, "$(P)Value.VAL PP")
}
For this tutorial we will create a simple UI which has buttons to trigger the TweakFwd and TweakRev records as well as an input for the Value.VAL and Value.DESC. Lets start by instantiating the widgets we will need.
We will start with the below code, which is a good starting point for most applications.
#include <pvtui/pvtui.hpp>
#include <ftxui/component/component.hpp>

using namespace ftxui;
using namespace pvtui;

int main(int argc, char *argv[]) {

    // Instantiate an App to manage everything
    App app(argc, argv);

    // Check for required macros if desired
    if (not app.args.macros_present({"P"})) {
        std::cerr << "Missing required macros\nRequired macros: P\n";
        return EXIT_FAILURE;
    }

    // Create all the widgets we need
    // InputWidget desc(app, "$(P)pvname.DESC", PVPutType::String);

    // ftxui container to define interactivity of components
    auto main_container = Container::Vertical({
        // include all the interactive widgets here
        // desc.component(),
    });

    // ftxui renderer defines the visual layout
    auto main_renderer = Renderer(main_container, [&] {
        // define the visual layout of the application
        // return hbox({ // e.g.
        //    desc.component()->Render()
        // })
    });

    // Run the main loop
    app.run(main_renderer);
}
Depending on your needs, you might need to modify the required macros check, but otherwise the above should apply to most basic TUIs.
First we will define the widgets we need.
// Create all the widgets we need
InputWidget desc(app, "$(P)Value.DESC", PVPutType::String);
InputWidget val(app, "$(P)Value.VAL", PVPutType::Double);
InputWidget twv(app, "$(P)TweakVal.VAL", PVPutType::Double);
ButtonWidget twf(app, "$(P)TweakFwd.PROC", " + ");
ButtonWidget twr(app, "$(P)TweakRev.PROC", " - ");
Any widget that a user can interact with must be added to a ftxui::Container, so we’ll do that now. Don’t worry too much about this. For most PVTUI apps, simply putting all the components in a Container::Vertical is all you need to do.
// ftxui container to define interactivity of components
auto main_container = Container::Vertical({
    desc.component(),
    val.component(),
    twf.component(),
    twr.component(),
    twv.component(),
});
Everything up to this point can mostly be considered to be boilerplate. Now we will do the hard part of defining the visual layout of the TUI. Some may find the syntax a bit different at first glace, but it is very nice when you get used to it. For more details on this part, consult the FTXUI documentation and example code.
// ftxui renderer defines the visual layout
auto main_renderer = ftxui::Renderer(main_container, [&] {
    return vbox({

        hbox({
            text("DESC: "),
            desc.component()->Render()
                | size(WIDTH, EQUAL, 15)
                | EPICSColor::edit(desc),
        }),

        separator(),

        hbox({
            text("VAL: "),
            val.component()->Render()
                | size(WIDTH, EQUAL, 11)
                | EPICSColor::edit(val),
        }),

        separatorEmpty(),

        hbox({
            twr.component()->Render(),
            separatorEmpty(),
            twv.component()->Render()
                | size(WIDTH, EQUAL, 5)
                | EPICSColor::edit(twv),
            separatorEmpty(),
            twf.component()->Render(),
        })

    }) | size(WIDTH, EQUAL, 20);
});
Looking through the above code, you’ll see we create a top level vbox (“vertical box”) with hbox’s (“horizontal box”) inside.
For each widget we call its Render() function then apply styles to it with the | operator. You’ll also notice the
EPICSColor namespace which defines some convenience functions for applying standard color schemes which also change if
connection to the PV is lost. Following the style of MEDM, widgets with EPICSColor will be rendered as white for both the
foreground and background if the underlying PV is disconnected. After defining the renderer, call app.run(main_renderer) to run the main application loop.
Load the test database in an IOC with a P macro of your choosing, e.g. softIoc -m "P=MyIoc:" -d test.db.
Then compile and run the PVTUI application: ./test_pvtui --macro "P=MyIoc:
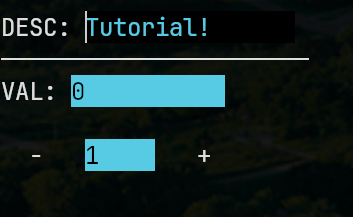
You should have a PVTUI application as in the screenshot below. Clicking plus or minus will add/subtract the TweakVal to Value.
and if the PVs are not connected, it will look like this:

That’s it. Below the full code is provided. At this point you might still be missing some details needed to make more complex applications. The best way to learn is by looking through the provided applications here, and also in the FTXUI repository.
#include <pvtui/pvtui.hpp>
#include <ftxui/component/component.hpp>

using namespace ftxui;
using namespace pvtui;

int main(int argc, char *argv[]) {

    // Instantiate an App to manage everything
    App app(argc, argv);

    // Check for required macros if desired
    if (not app.args.macros_present({"P"})) {
        printf("Missing required macro P\n");
        return EXIT_FAILURE;
    }

    // Create all the widgets
    InputWidget desc(app, "$(P)Value.DESC", PVPutType::String);
    InputWidget val(app, "$(P)Value.VAL", PVPutType::Double);
    InputWidget twv(app, "$(P)TweakVal.VAL", PVPutType::Double);
    ButtonWidget twf(app, "$(P)TweakFwd.PROC", " + ");
    ButtonWidget twr(app, "$(P)TweakRev.PROC", " - ");

    // ftxui container to define interactivity of components
    auto main_container = Container::Vertical({
        desc.component(),
        val.component(),
        twf.component(),
        twr.component(),
        twv.component(),
    });

    // ftxui renderer defines the visual layout
    auto main_renderer = ftxui::Renderer(main_container, [&] {
        return vbox({

            hbox({
                text("DESC: "),
                desc.component()->Render()
                    | size(WIDTH, EQUAL, 15)
                    | EPICSColor::edit(desc),
            }),

            separator(),

            hbox({
                text("VAL: "),
                val.component()->Render()
                    | size(WIDTH, EQUAL, 11)
                    | EPICSColor::edit(val),
            }),

            separatorEmpty(),

            hbox({
                twr.component()->Render(),
                separatorEmpty(),
                twv.component()->Render()
                    | size(WIDTH, EQUAL, 5)
                    | EPICSColor::edit(twv),
                separatorEmpty(),
                twf.component()->Render(),
            })

        }) | size(WIDTH, EQUAL, 20);
    });

    // Run the main loop
    app.run(main_renderer);

    return EXIT_SUCCESS;
}